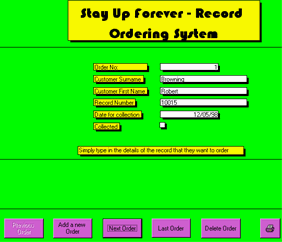
How to use the Order Record Screen
The Order Form navigation buttons are like other form navigation buttons:

The first button is "Previous Order", which takes you to the order previous to the one you are looking at.
The next button is "Add a new Order". This allows the customer to order a record. The first field to fill in is "Customer Surname". Don't try and fill in "Order No." as this field is called "Auto-Number", which means the program makes the number for you.
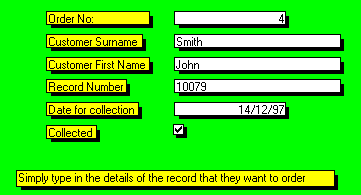
The next field is "Customer First Name". Make sure that the two fields are spelt correctly.
Next, you have to fill in the Record No. You should have already found this out from the Search Screen. Type in this number carefully, but don't worry about mistakes as the program won't let you type complete rubbish in. If you suspect that a number isn't correct, double-check it with the Search Screen.
The next field is when it is due for collection. The date entered should be the date of the next Saturday after the day the order was made.
The final field is "Collected". When the customer collects the record and purchases it, click the little box so that there is a tick in it. If you find a box unchecked when the order is over a month old, consult your manager.
The next button is "Next Order" option, which will take you to the order after the one you are looking at.
The button after that is "Last Order". Nothing to do with pubs, sadly. This will take you to the last order that was made.
Then we have "Delete Order". This is to be used with extreme caution. Only if your manager gives you explicit instructions to delete an order should you even consider looking at this button. If you have to delete an order, go to the order you want and press this button. The program asks you "Are you really sure?". If not, then click "No". If you are really sure, then click "Yes" and accept the consequences.
The last button is "Print Order", which looks like:

This will print out the order that you are looking at. To print out all the orders see Open the Tables for Printing.